
Gather a Raspberry Pi, a two-way mirror, and an LCD monitor to begin creating your smart mirror. Connect the Raspberry Pi to the LCD using an HDMI cable and securely attach the mirror to the monitor. Install the MagicMirror² platform on your Raspberry Pi for configuring the display interface. Customize the mirror’s features by adding modules like weather forecasts, calendar events, and news feeds.
Why Build a Smart Mirror?
Convenience and Daily Use
Imagine starting your day with all the information you need right in your bathroom or bedroom. A smart mirror powered by Raspberry Pi can transform your daily routine by displaying real-time updates like weather forecasts, news headlines, and calendar events as you brush your teeth or style your hair. This DIY project offers convenience at a glance, making it an excellent addition to any smart home setup. With simple integration of apps and widgets, your smart mirror turns into a personalized dashboard, seamlessly blending technology with your daily tasks. It not only saves you time but also helps you stay informed and organized effortlessly.
Customization and Personalization
Building a smart mirror with a Raspberry Pi offers incredible customization and personalization options to fit your unique needs. With a Raspberry Pi at its core, tech enthusiasts can easily modify and expand its functionalities with various modules and features. Whether you want to display weather updates, headlines, or your daily schedule, there are endless possibilities. You can personalize the interface to match your style or even integrate it with other home automation projects. By using open-source platforms, you have the freedom to tweak the software and hardware, ensuring your smart mirror completely aligns with your personal preferences.
Gathering Your Tools and Materials
To embark on your smart mirror project, gathering the right tools and materials is crucial. At the heart of your smart mirror will be the Raspberry Pi 4, a versatile and powerful microcomputer that runs the brains of your device. This model offers the processing power necessary to smoothly display information with its quad-core processor and up to 4GB of RAM, ensuring your mirror is as smart as it is reflective.
Next, you’ll need a two-way mirror. This special glass allows the display to shine through while still functioning as a regular mirror. This component is key to achieving the perfect blend of form and function in your project. For the display, an old monitor or a new thin display that fits your mirror size will work perfectly. Make sure it has HDMI support, which allows seamless integration with the Raspberry Pi.
Include a USB keyboard and mouse to facilitate the initial setup, although they won’t be necessary for everyday use once everything is up and running. Don’t forget a Wi-Fi dongle or an Ethernet cable to ensure your Raspberry Pi has internet connectivity, enabling real-time updates.
A sturdy frame to house your components is also essential. This could be a custom-built wooden frame or a modified photo frame to keep everything neat and presentable. Lastly, an appropriate power supply for your Raspberry Pi and some connection cables will be needed to power the device and allow communication between your components. With these elements in place, you’ll be well-equipped to start crafting your smart mirror masterpiece.

Step-by-Step Building Instructions
Setting Up the Raspberry Pi
To get started on your smart mirror project, the first step is setting up your Raspberry Pi. Begin by installing the latest version of the Raspberry Pi OS. You can easily download it and flash it onto a microSD card using tools like Raspberry Pi Imager or Balena Etcher. Once the OS is installed, insert the microSD card into your Raspberry Pi and power it up.
After booting, you’ll need to make some initial configurations. Connect your Raspberry Pi to a monitor, keyboard, and mouse. Follow the setup wizard to select your preferred language, timezone, and Wi-Fi network. Make sure to update the software by opening a terminal and typing `sudo apt update && sudo apt upgrade` to ensure everything is up to date.
Once the updates are complete, enable SSH through the Raspberry Pi configuration tool. This allows you to remotely access your Raspberry Pi from another device. With your Raspberry Pi set up and configured, you’re ready to move on to the exciting part—transforming it into a smart mirror.
Installing the MagicMirror² Software
To install MagicMirror² on your Raspberry Pi, start by ensuring your system is up to date by running `sudo apt update && sudo apt upgrade`. This prepares your Pi with the latest packages. Next, install Node.js, which is essential for running MagicMirror². Use the command `curl -sL https://deb.nodesource.com/setup_16.x | sudo -E bash -` followed by `sudo apt install -y nodejs`. Now, clone the MagicMirror² repository with `git clone https://github.com/MichMich/MagicMirror` in your home directory. Navigate into the new MagicMirror folder with `cd MagicMirror`, and install the necessary dependencies using `npm install`. This process might take a few minutes as it sets up all the required modules. Once everything is installed, start the MagicMirror² software with `npm start`. Your smart mirror interface should now be up and running, ready for you to customize and enhance with various modules and plugins.
Assembling the Mirror Frame
To begin assembling the mirror frame, start by gathering your materials: a standard mirror pane, a wooden or metal frame kit, screws, and brackets. If you’re using a prefabricated frame kit, follow the included instructions to securely fit the mirror pane. For a DIY approach, select a sturdy wood like pine or oak for a warm, natural look, or opt for metal for a sleek, modern design. Measure the dimensions of the mirror pane carefully and cut the frame pieces to size using a saw. Ensure your cuts are precise to achieve a snug fit.
Next, position the frame pieces around the mirror, double-checking alignment. Use corner brackets on the reverse side of the frame to join the corners seamlessly. Drill pilot holes for screws to prevent the wood from splitting. Attach the brackets with screws, tightening them securely. If your design allows, reinforce the frame with additional brackets positioned at the top and bottom edges.
Once the frame is assembled, consider adding a backing to protect the electronics of your smart mirror. A piece of plywood cut to the appropriate size works well. Attach it using small screws or adhesive strips, ensuring easy access for future maintenance or upgrades. Lastly, test fit the Raspberry Pi and any additional components inside the frame to verify everything sits comfortably before final assembly.
Enhancing Functionality with Modules
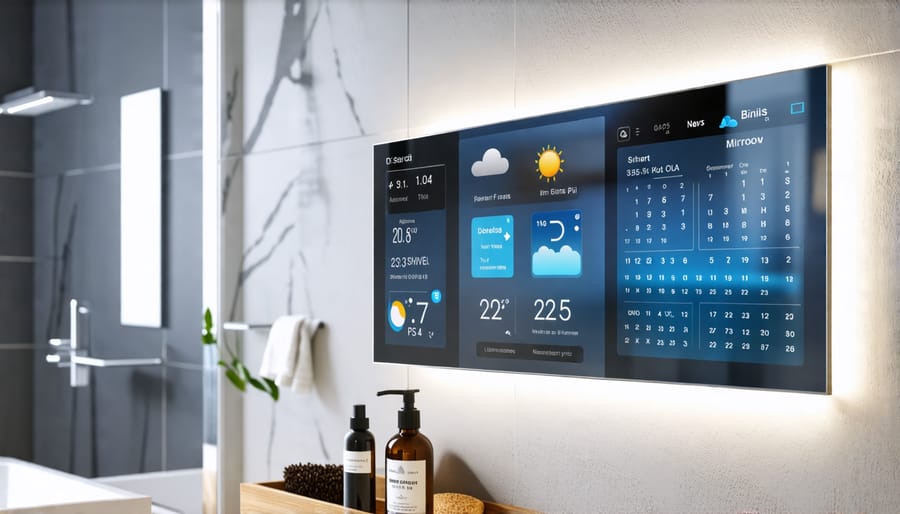
Building a smart mirror with a Raspberry Pi is an exciting project that brings daily conveniences to the forefront with simple yet effective applications. Among the popular modules for your smart mirror are the calendar, weather, and news feeds. These modules turn your reflective surface into an informative display as dynamic as your day.
To incorporate a calendar module, you typically configure it to sync with your existing Google Calendar. This allows events and reminders to seamlessly pop up, ensuring you never miss an appointment. Setting it up involves installing the MagicMirror² platform on your Raspberry Pi, then downloading the default calendar module. Through the configuration file, you can input your calendar’s public URL, bringing your daily schedule directly to your smart mirror.
The weather module allows you to display forecasts, a helpful feature before stepping out each day. By obtaining an API key from a free weather service like OpenWeather, you can customize weather updates according to your location. The setup process involves adding this key to the module’s configuration file, enabling your mirror to deliver current weather conditions and forecasts straight to your reflection.
News feeds work similarly, fetching the latest headlines from your chosen sources. You can select RSS feeds from major news outlets, ensuring you stay informed as you prepare for the day. By modifying the news module in the configuration file, you can tailor news sources to suit your interests, balancing brevity with insightful updates.
These modules are installed and configured using clear instructions typically provided within the MagicMirror² documentation, making this a truly educational and rewarding endeavor for any tech enthusiast or hobbyist.
Maintaining and Troubleshooting Your Smart Mirror
Keeping your smart mirror in top shape involves a few straightforward maintenance steps and troubleshooting tips. Regularly clean the mirror surface with a soft, microfiber cloth to avoid scratches, and check your Raspberry Pi for dust build-up, which can lead to overheating. It’s also beneficial to update the software periodically to ensure you have the latest features and security patches.
If you’re experiencing connectivity issues, consider rebooting your Raspberry Pi and router. Ensure all cables are securely connected and restart the mirror display if there are any screen issues. In case of software glitches, revisit the module configurations; a small error or typo can often cause unexpected behavior. Sometimes, reinstalling a problematic module can solve persistent issues.
For hobbyists creating a customized interface, backup your configurations regularly. This practice allows you to experiment boldly without the fear of losing progress. Diving into forums and community resources can also offer solutions if you’re stuck. Embrace the iterative nature of tech projects—each challenge is an opportunity to enhance your understanding and skills.
Conclusion
Building a smart mirror with a Raspberry Pi offers a unique blend of creativity and technology, enhancing both functionality and style in your home. This project is not only a fantastic way to learn about hardware and software integration but also customizable to your needs. Jumpstart your innovation journey and create your own smart mirror today!