
Discover the power and versatility of the Raspberry Pi 4 Model B by mastering its pinout. This comprehensive guide provides a detailed overview of the 40-pin GPIO header, enabling you to unlock the full potential of your Pi for countless projects and innovations. With clear diagrams, expert insights, and practical examples, you’ll quickly learn how to configure and utilize each pin effectively. Whether you’re a beginner or an experienced maker, understanding the Raspberry Pi 4 Model B pinout is essential for bringing your ideas to life. Get ready to dive into the world of possibilities and take your projects to new heights with this indispensable resource.
Raspberry Pi 4 Model B Overview
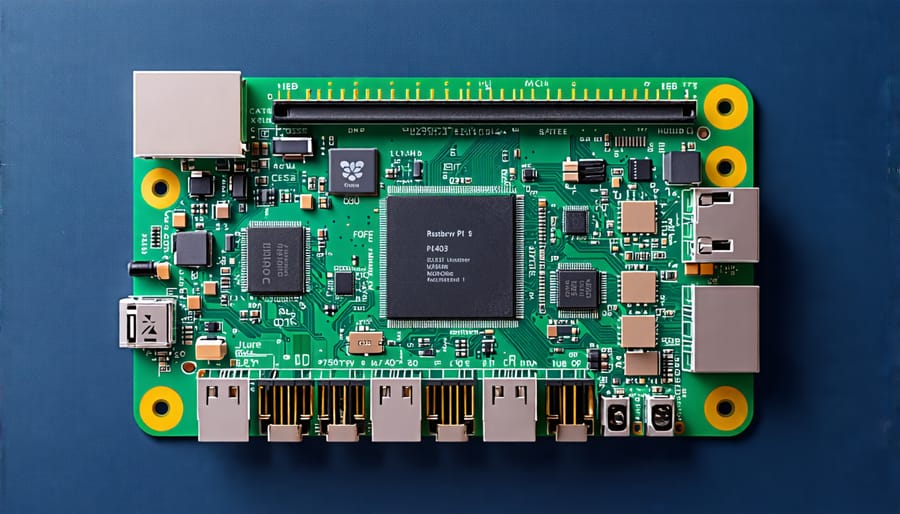
Processor and Memory
The Raspberry Pi 4 Model B boasts a powerful Broadcom BCM2711 quad-core Cortex-A72 (ARM v8) 64-bit SoC, clocked at 1.5GHz. This CPU delivers a significant performance boost compared to its predecessors, making it capable of handling demanding applications and multitasking with ease. Depending on the variant, the Raspberry Pi 4 Model B comes with 2GB, 4GB, or 8GB of LPDDR4-3200 SDRAM, providing ample memory for running multiple programs, browsing the web, and executing memory-intensive tasks. These impressive specifications enable the Raspberry Pi 4 Model B to deliver desktop-level performance in a compact, energy-efficient package.
Connectivity Options
The Raspberry Pi 4 Model B offers a variety of connectivity options to cater to your project needs. It features two USB 3.0 ports and two USB 2.0 ports, allowing you to connect peripherals like keyboards, mice, and external storage devices. For network connectivity, the board includes a Gigabit Ethernet port, enabling fast and reliable wired internet access. The Raspberry Pi 4 also comes with dual micro HDMI ports, supporting dual displays with resolutions up to 4K. This makes it an excellent choice for multimedia projects or creating a powerful desktop setup. Additionally, the board includes a Camera Serial Interface (CSI) and Display Serial Interface (DSI) for connecting compatible camera modules and displays, respectively. With Bluetooth 5.0 and dual-band 2.4GHz and 5GHz wireless LAN, the Raspberry Pi 4 ensures seamless wireless connectivity for your projects. These diverse connectivity options make the Raspberry Pi 4 Model B a versatile single-board computer for a wide range of applications.
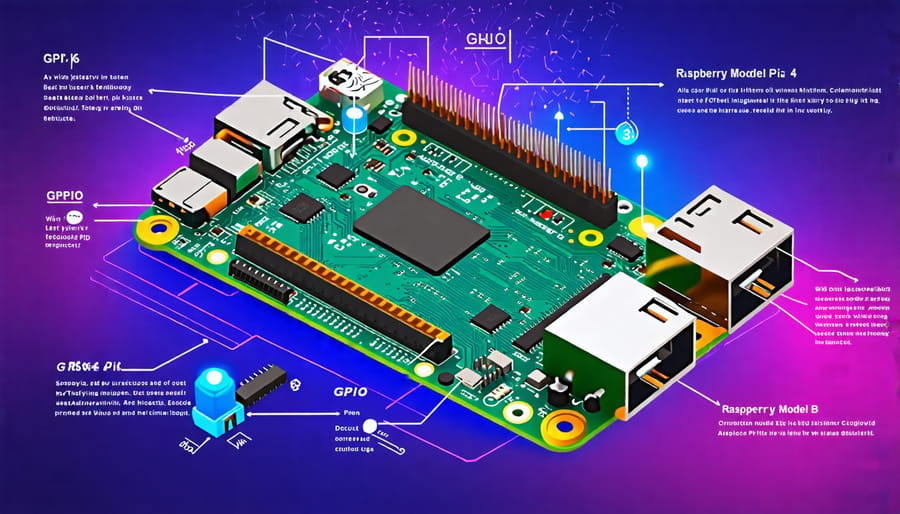
Raspberry Pi 4 Model B Pinout Diagram
Power Pins
The Raspberry Pi 4 Model B features two dedicated power pins: 5V (Pin 2 and Pin 4) and 3.3V (Pin 1 and Pin 17). The 5V pins are primarily used to power the board itself and can also supply power to connected peripherals that require 5V. It is important to note that the 5V pins are directly connected to the input power supply, so ensure that any connected devices can handle the voltage. On the other hand, the 3.3V pins provide a lower voltage suitable for powering smaller components or modules that require 3.3V. These pins are regulated and can safely supply up to 500mA of current. When working with the power pins, always double-check the voltage requirements of your connected devices to avoid potential damage. Additionally, be mindful of the total current draw to prevent overloading the Raspberry Pi’s power supply.
GPIO Pins
The Raspberry Pi 4 Model B features a 40-pin GPIO (General Purpose Input/Output) header, providing a versatile interface for connecting external components and peripherals. These pins can be configured as either inputs or outputs, allowing users to interact with various sensors, actuators, and other devices. The GPIO pins operate at 3.3V logic levels and are not 5V tolerant, so caution must be exercised when connecting external circuitry to avoid damaging the board.
Each GPIO pin can source or sink a maximum current of 16mA, with an aggregate current limit of 50mA across all pins. This current capacity is sufficient for driving LEDs, small relays, and low-power devices directly. For more power-hungry components, external driver circuits or modules are recommended.
The Raspberry Pi 4 Model B’s GPIO pins support various communication protocols, including I2C, SPI, and UART, facilitating seamless integration with a wide range of sensors and peripherals. Additionally, several pins offer PWM (Pulse Width Modulation) functionality, enabling users to control servo motors, dim LEDs, or generate analog-like signals.
To ensure safe and reliable operation, it is crucial to follow best practices when working with the GPIO pins. Always refer to the official pinout diagram and documentation to identify the correct pin assignments and functions. Use appropriate current-limiting resistors, voltage dividers, and protection circuits as needed to prevent damage to the Raspberry Pi or connected devices. With proper configuration and usage, the GPIO pins open up a world of possibilities for creating innovative projects and applications.
Special Function Pins
The Raspberry Pi 4 Model B features several special function pins that enable communication with external devices and peripherals. The Inter-Integrated Circuit (I2C) pins, SDA and SCL, allow for easy connection to sensors, displays, and other I2C-compatible devices. These pins support the I2C protocol, which enables multiple devices to communicate with the Pi using just two wires.
For high-speed serial communication, the Raspberry Pi 4 Model B offers Serial Peripheral Interface (SPI) pins, including MOSI, MISO, SCLK, and CE0/CE1. SPI is commonly used for connecting devices like ADCs, DACs, and shift registers. It provides full-duplex communication and supports higher data rates compared to I2C.
The Universal Asynchronous Receiver-Transmitter (UART) pins, TXD and RXD, facilitate serial communication with devices like GPS modules, Bluetooth adapters, and other microcontrollers. UART allows for simple, low-speed serial data transfer using two wires.
Additionally, the Raspberry Pi 4 Model B includes a PWM pin, which can generate Pulse Width Modulated signals. PWM is useful for controlling servo motors, dimming LEDs, and creating analog-like outputs from the digital GPIO pins.
By leveraging these special function pins, users can expand the capabilities of their Raspberry Pi 4 Model B and interface with a wide range of sensors, actuators, and communication modules, opening up endless possibilities for innovative projects and applications.
Pinout Configuration and Usage
GPIO Pin Programming
The Raspberry Pi 4 Model B’s GPIO pins can be easily controlled and programmed using popular programming languages, with Python being the most widely used. To get started, ensure you have the latest version of Python installed on your Raspberry Pi. The RPi.GPIO library is a convenient way to interact with the GPIO pins in Python. Begin by importing the library and setting up the GPIO mode to either BCM or BOARD, depending on your preference for referencing the pins.
With the library imported, you can now configure individual pins as inputs or outputs using the GPIO.setup() function. To read the state of an input pin, use GPIO.input(), which returns a boolean value indicating whether the pin is HIGH or LOW. For output pins, use GPIO.output() to set the pin’s state to either HIGH (3.3V) or LOW (0V).
Python also allows you to utilize PWM (Pulse Width Modulation) on the GPIO pins, enabling you to control the brightness of LEDs or the speed of motors. The GPIO.PWM() function is used to create a PWM instance on a specific pin with a desired frequency. You can then set the duty cycle using the ChangeDutyCycle() method to vary the PWM signal.
In addition to basic input and output control, the RPi.GPIO library provides event detection and callback functions. These allow you to trigger specific actions based on pin state changes, such as detecting button presses or sensor inputs. The GPIO.add_event_detect() function is used to register an event on a pin, specifying the edge type (rising, falling, or both) and the callback function to be executed when the event occurs.
Remember to always clean up your GPIO connections at the end of your program using GPIO.cleanup(). This ensures that all pins are reset to their default states, preventing potential issues with future GPIO usage. With these basic concepts in mind, you can start exploring more advanced projects, such as controlling sensors, motors, and displays, or even setting up remote access to your Raspberry Pi for convenient programming and monitoring.
Common Pinout Configurations
Here are a few common pinout configurations for popular Raspberry Pi 4 Model B projects:
For robotics projects, you’ll typically utilize the GPIO pins for motor control, servo connections, and sensor inputs. A basic configuration might include connecting motors to GPIO pins 12 and 13, a servo to GPIO 18, and an ultrasonic sensor to GPIO 23 and 24.
If you’re setting up a home automation system, you might use GPIO pins 5 and 6 for I2C communication with a temperature sensor, GPIO 17 for controlling a relay, and GPIO 27 for a motion sensor input.
When building game servers or media centers, you’ll primarily use the USB ports for peripherals and the Ethernet port for network connectivity. The GPIO pins may be used for additional features like LED status indicators or fan control.
Remember, these are just a few examples, and your specific pinout configuration will depend on your project requirements and the components you’re using. Always refer to your project’s wiring diagram and double-check your connections before powering on your Raspberry Pi 4 Model B.
Pinout Safety and Best Practices
When working with the Raspberry Pi 4 Model B pinout, it’s crucial to prioritize safety and follow best practices to protect both the board and connected components. Always handle the board with care, avoiding static electricity and ensuring your workspace is clean and dry. Before connecting any components or peripherals, double-check the pinout diagram to ensure proper connections and avoid short circuits or incorrect voltages.
It’s essential to use the appropriate voltage levels for each pin. The Raspberry Pi 4 Model B operates on 3.3V logic, so connecting 5V devices directly to the GPIO pins can damage the board. Use level shifters or voltage dividers when interfacing with higher voltage components. Additionally, be mindful of the maximum current draw from each pin and the total current consumption of connected devices to prevent overloading the board.
When connecting or disconnecting components, always power down the Raspberry Pi first. Hot-swapping components can lead to electrical spikes and potential damage. If you’re unsure about a connection, consult the official documentation or seek guidance from the Raspberry Pi community forums.
Applying proper electrical insulation and using appropriate connectors can help prevent accidental short circuits. Consider using GPIO extension boards or breakout boards to provide additional protection and ease of use. Regularly inspect your connections for any signs of wear, loose wires, or exposed conductors.
Lastly, keep your Raspberry Pi 4 Model B in a well-ventilated environment to prevent overheating. Use a suitable case or heatsink if necessary, especially when running resource-intensive applications or overclocking the board. By following these safety considerations and best practices, you can ensure a reliable and enjoyable experience while exploring the vast potential of the Raspberry Pi 4 Model B pinout in your projects.
Conclusion
In conclusion, the Raspberry Pi 4 Model B pinout offers a wealth of possibilities for tech enthusiasts, hobbyists, and educators alike. By understanding the board’s layout, configuration options, and best practices for safe usage, you can unlock its full potential in your projects. Whether you’re creating IoT devices, building robots, or exploring the world of electronics, the Raspberry Pi 4 Model B provides a versatile and powerful platform to bring your ideas to life. So, grab your Raspberry Pi, consult the pinout diagram, and start experimenting with the endless opportunities it presents. With a little creativity and the right knowledge, you can create something truly remarkable. Happy tinkering!