
Transform your Raspberry Pi cluster into a professional-grade computing powerhouse with a custom 3D-printed case that maximizes airflow, simplifies maintenance, and protects your investment. When building a Raspberry Pi cluster, the case design becomes crucial for both functionality and longevity. Modern 3D printing technology enables precise control over component spacing, cooling channels, and cable management – essential elements often missing from commercial alternatives. Print your cluster case using PETG or ABS filament for superior heat resistance and structural integrity, while incorporating stackable modules that accommodate future expansion. This guide walks through the complete process of designing, printing, and assembling a professional-grade cluster case that transforms loose components into a cohesive, efficient computing system.
Essential Components for Your Cluster Case
Hardware Requirements
To build your Raspberry Pi cluster case, you’ll need several essential components. For the basic structure, gather 2-4 Raspberry Pi boards (depending on your cluster size), along with their corresponding micro SD cards and power supplies. The mounting hardware includes M2.5 screws and standoffs for securing the Pis, plus M3 screws and nuts for assembling the case components.
Cooling is crucial for cluster performance. Include 30mm or 40mm cooling fans (one per Pi recommended), along with necessary fan cables and power splitters. A mesh design in your case will also aid airflow. For power distribution, consider a powered USB hub or dedicated power supply unit capable of delivering 2.5A per Pi board.
Additional hardware requirements include:
– Ethernet cables (short, flexible ones work best)
– Network switch (5-port or larger)
– USB to micro-USB cables
– Cable ties for management
– Heat sinks for each Pi
– Anti-vibration fan mounts
– Rubber feet for the case bottom
For the 3D printing itself, you’ll need PLA or PETG filament (approximately 250-350g depending on case size), with PETG being preferred for its heat resistance properties.
3D Printing Specifications
For optimal results, use PETG or ABS filament, as these materials offer better heat resistance and durability compared to PLA. The recommended layer height is 0.2mm for a balance between print time and detail quality. Set your print temperature between 230-250°C for PETG or 220-235°C for ABS, with a bed temperature of 80-85°C for PETG or 100-110°C for ABS.
Enable supports for overhanging features, particularly around the Pi mounting points and ventilation slots. A 15-20% infill density provides adequate structural integrity while keeping print time reasonable. Print with a minimum of 3 perimeter walls for enhanced durability.
The case design typically requires approximately 250-300g of filament and takes 12-15 hours to print, depending on your printer settings. For best results, print with a 0.4mm nozzle and ensure your printer is properly calibrated for dimensional accuracy.
Consider printing the case components in separate parts to minimize support material usage and improve print quality. Use a brim or raft if you experience adhesion issues, particularly with ABS. Post-processing may include light sanding of mounting points and ventilation holes for smooth assembly.
Designing Your Cluster Case
Design Considerations
When designing a 3D-printed case for your mini supercomputer setup, several crucial factors need careful consideration to ensure optimal performance and longevity. Proper airflow management stands as a primary concern, requiring strategically placed ventilation holes or grids to prevent overheating. Consider incorporating active cooling solutions like 40mm fan mounts, especially for clusters running compute-intensive tasks.
Cable management is another vital aspect that demands attention. Design your case with dedicated routing channels and access points for power, network, and peripheral cables. This not only creates a cleaner appearance but also improves maintenance accessibility and prevents cable strain that could damage your Pi boards.
Scalability should be built into your design from the start. Consider creating modular sections that can be easily printed and assembled to accommodate additional Pi boards as your cluster grows. Include mounting points for future expansions and ensure your power distribution system can handle extra nodes.
Other important considerations include:
– Sturdy mounting points for each Pi board
– Easy access panels for maintenance
– Clearance for heat sinks and cooling solutions
– Protection against dust accumulation
– Structural integrity to support the weight of all components
– Space for network switches and power distribution
Remember to test your design with a single unit before printing multiple pieces to avoid wasting materials on potential design flaws.
Customization Options
The beauty of 3D printing your Raspberry Pi cluster case lies in its endless customization possibilities. You can easily modify the basic design to accommodate different Pi models, from the compact Pi Zero to the full-sized Pi 4. Consider adjusting the mounting holes and spacing between boards based on your specific Pi models and cooling requirements.
For enhanced cooling, you can incorporate additional ventilation slots or fan mounts into your design. Popular modifications include 40mm fan brackets for active cooling and strategically placed vents for improved airflow. You might also want to add cable management features like built-in channels or routing holes to keep your cluster neat and organized.
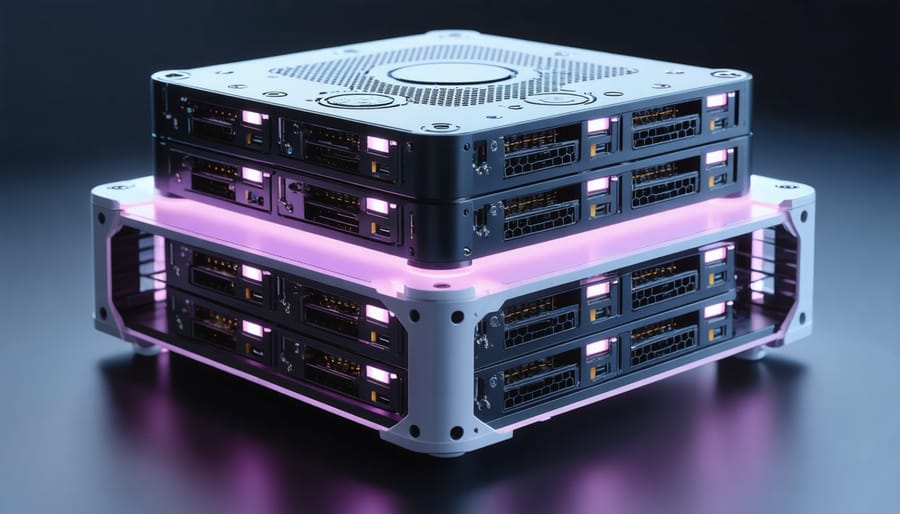
The case can be scaled to house anywhere from two to eight Pis, depending on your project needs. Some makers opt to include a dedicated space for a network switch or power distribution board. You can also modify the design to include mounting points for SSDs or other storage devices if your cluster requires additional storage capacity.
Don’t forget about accessibility – consider adding removable panels or a hinged top for easier maintenance. For monitoring purposes, you might want to include a cutout for a small LCD display or status LEDs. The case thickness can be adjusted based on your structural requirements, typically ranging from 2mm to 4mm for optimal strength while maintaining reasonable print times.
Assembly and Installation
Case Assembly Steps
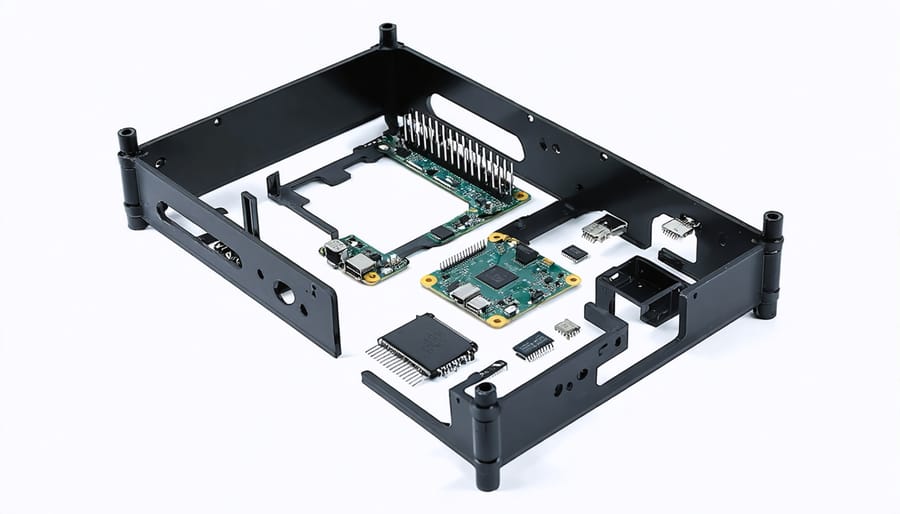
Begin by gathering all your printed components and necessary hardware. You’ll need the base plate, stackable layers, top cover, and mounting hardware that came with your Raspberry Pi boards. Ensure all 3D printed parts are clean and free from support material.
Start with the base plate, positioning it on a flat surface with the mounting holes facing up. Install the first set of standoffs into the designated holes, ensuring they’re firmly secured but not overtightened. These will support your first Raspberry Pi board.
Place your first Raspberry Pi onto the standoffs, aligning it carefully with the mounting holes. Secure it using the appropriate screws, making sure the board sits level and doesn’t wobble. Connect any necessary cooling fans or heatsinks at this stage.
For each additional layer, attach the printed spacers to the previous level using the provided holes. These spacers create the perfect distance between boards while ensuring proper airflow. Repeat the process of mounting Raspberry Pis, being careful to maintain consistent orientation for easier cable management.
As you stack each layer, route your power and network cables through the designated cable management channels. It’s recommended to connect and test each Pi before adding the next layer to ensure everything functions correctly.
Finally, attach the top cover, securing it with the remaining screws. Double-check that all connections are tight and cables are properly organized. Your cluster case should now provide stable housing for your Raspberry Pi boards while maintaining adequate ventilation and easy access for maintenance.
For optimal performance, ensure all ventilation holes remain unobstructed and regularly check that mounting screws haven’t loosened during operation.
Cable Management and Power Setup
Proper cable management and power distribution are crucial for maintaining a clean, efficient, and safe Raspberry Pi cluster. Start by arranging your power cables in a systematic pattern, using cable ties or Velcro straps to bundle them together. For optimal organization, route your cables along the case’s edges and through any dedicated cable management channels included in your 3D printed design.
For power distribution, consider using a dedicated power supply unit (PSU) with multiple USB ports rated at 5V/2.5A per port. Alternatively, you can use a powered USB hub that can handle the combined power requirements of your Pi cluster. Remember that each Raspberry Pi typically requires between 2.5A and 3A for stable operation, so calculate your total power needs accordingly.
To minimize cable clutter, measure and cut your cables to appropriate lengths, leaving just enough slack for maintenance access. Use right-angle USB adapters where possible to reduce strain on the cables and create a neater appearance. Consider incorporating cable combs or 3D printed cable guides into your case design to maintain consistent spacing and alignment.
For network cables, implement a similar organization strategy, keeping them separate from power cables to prevent interference. If your case design allows, create dedicated routing paths for ethernet cables, ensuring they don’t cross over power lines whenever possible.
Label all cables clearly using small tags or heat-shrink labels to make future maintenance easier. This step is particularly important as your cluster grows. Finally, perform regular checks of all power connections to ensure they remain secure and haven’t loosened over time due to vibration or temperature changes.
Optimization and Maintenance
Cooling Solutions
Effective cooling is crucial for maintaining optimal performance in a Raspberry Pi cluster. The compact nature of these clusters can lead to heat buildup, potentially causing thermal throttling or hardware damage. To address this, several cooling strategies can be implemented in your 3D-printed case design.
Active cooling through strategically placed fans is highly recommended. Consider incorporating 40mm fan mounts at both intake and exhaust points. The case design should include ventilation grills or honeycomb patterns to maximize airflow while maintaining structural integrity. For optimal results, position the fans to create a consistent airflow path across all Pi boards.
Passive cooling elements are equally important. Design the case with adequate spacing between boards (minimum 15mm) and include heatsink mounting points. Aluminum or copper heatsinks can be attached to the processors and other heat-generating components. Some makers opt for combining both methods by connecting temperature sensors to monitor heat levels and activate fans only when necessary.
The case material choice also impacts cooling efficiency. While PLA is common, PETG offers better heat resistance and is less likely to deform under sustained heat. Consider printing the case with a minimum of 20% infill to ensure proper air circulation while maintaining structural strength. Adding dedicated cooling channels in the design can further enhance heat dissipation throughout the cluster.
Troubleshooting Common Issues
When troubleshooting your 3D-printed Raspberry Pi cluster case, several common issues may arise. Print layer separation is often caused by incorrect bed temperature or poor adhesion. To fix this, ensure your print bed is properly leveled and consider using a brim or raft for better adhesion. If your case pieces don’t fit together properly, check for proper scaling in your slicer settings and verify that your printer is properly calibrated.
Heat management problems are another frequent concern. If your Pis are running hot, check that all ventilation holes are clear of support material and debris. Consider adding more ventilation holes or increasing the fan opening sizes in your design. For cases aiming for industrial-grade reliability, proper cooling is essential.
Warping during printing can affect the case’s structural integrity. Use an enclosure while printing, reduce cooling fan speeds for the first few layers, and ensure your print surface is clean. If you notice cracks developing in the case over time, consider printing with a higher infill percentage or adding reinforcement ribs to your design.
Regular maintenance is crucial. Check mounting points periodically for stress cracks, clean ventilation holes monthly, and inspect cable management solutions for wear. If using stackable modules, ensure connecting mechanisms remain secure and adjust tolerances in your design if needed.
Building a 3D-printed Raspberry Pi cluster case is an exciting and rewarding project that combines the best of maker culture with practical computing applications. By following the guidelines and considerations we’ve discussed, you can create a custom case that not only protects your Pi cluster but also optimizes its performance through proper cooling and cable management.
Remember to carefully consider your specific needs when designing or selecting a case model, paying particular attention to the number of Pis you plan to stack, airflow requirements, and accessibility for maintenance. The choice of printing materials is crucial, with PETG and ABS offering excellent durability and heat resistance for long-term use.
For those new to 3D printing, start with simpler designs and gradually work your way up to more complex modifications. Don’t be afraid to iterate on your design – each version will teach you something new about both 3D printing and Raspberry Pi cluster management.
As your next steps, consider joining online maker communities to share your designs and learn from others’ experiences. Document your build process and any modifications you make – this information is invaluable to the maker community. Whether you’re building a cluster for learning, home automation, or experimentation, a well-designed 3D-printed case will serve as the foundation for your project’s success.
Keep exploring and innovating – the possibilities with Raspberry Pi clusters are endless, and your custom 3D-printed case is just the beginning of your journey into the world of clustered computing.