

Transform your Raspberry Pi into a powerful IoT hub by integrating XBee wireless modules, enabling secure, long-range communication for enterprise-grade applications. XBee modules, when paired with Raspberry Pi’s versatile computing platform, create a robust foundation for wireless sensor networks, industrial automation, and remote monitoring systems. This powerful combination leverages XBee’s mesh networking capabilities and the Pi’s processing power to deliver reliable, scalable IoT solutions that can handle everything from simple data collection to complex machine-to-machine communication protocols.
The XBee-Raspberry Pi integration stands out in enterprise environments where reliability and security are paramount. Operating on the proven IEEE 802.15.4 protocol, XBee modules provide industrial-strength wireless communication while the Raspberry Pi offers the flexibility to implement advanced encryption, data processing, and cloud connectivity. Whether you’re building a smart factory monitoring system or developing a distributed sensor network, this technology stack delivers professional-grade performance while maintaining cost-effectiveness and ease of implementation.
Learn how to harness this powerful duo to create secure, scalable IoT solutions that meet enterprise standards while remaining accessible for rapid prototyping and development.
Understanding XBee-Raspberry Pi Integration
XBee Hardware Requirements
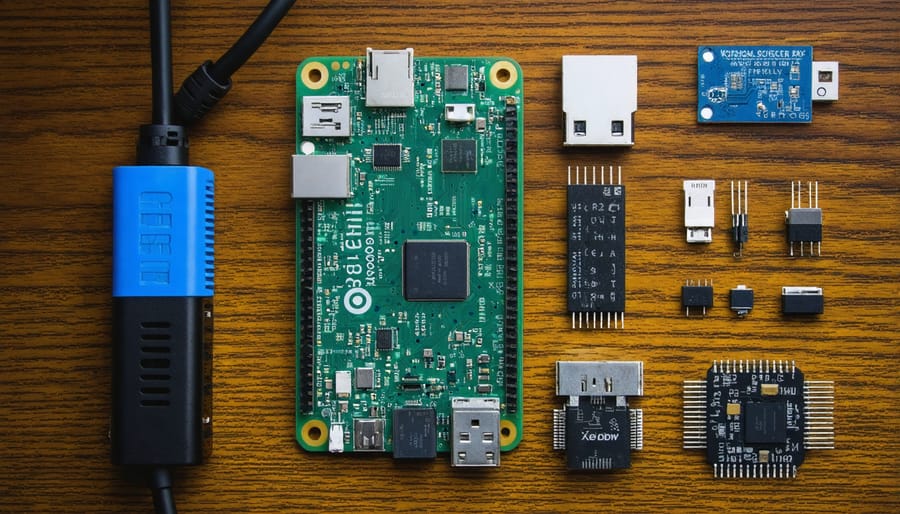
To set up an XBee module with your Raspberry Pi, you’ll need several essential components. First, you’ll need a Raspberry Pi board (any model from Pi 3 or newer is recommended) and an XBee module (Series 1 or Series 2 are commonly used). An XBee adapter or shield is crucial for connecting the module to your Pi – this can be either a USB adapter or a GPIO shield specifically designed for XBee.
You’ll also need an XBee Explorer board or breakout board to program and configure your XBee module. For power supply, ensure you have a reliable 5V power source for your Raspberry Pi. The connection requires a standard USB cable if using a USB adapter, or jumper wires if using GPIO pins.
Additional components include:
– FTDI cable (for initial XBee configuration)
– Female-to-male jumper wires (if using GPIO)
– Breadboard (optional, but recommended for prototyping)
– Antenna (either built-in or external, depending on your XBee model)
– MicroSD card (8GB or larger) with Raspberry Pi OS installed
Remember to check compatibility between your chosen XBee model and adapter before purchase, as different series may require specific hardware configurations.
Communication Protocols
XBee modules primarily utilize the ZigBee protocol and IEEE 802.15.4 standard for wireless communication, making them ideal for IoT applications with Raspberry Pi. ZigBee operates on the 2.4 GHz frequency band and is designed specifically for low-power, low-data-rate communication over relatively short distances.
The IEEE 802.15.4 standard forms the foundation for ZigBee, providing the physical and MAC layers of the protocol stack. This standard ensures reliable point-to-point communication with features like collision avoidance and automatic retransmission of data packets.
XBee modules can be configured in different network topologies: point-to-point, star, or mesh networks. In mesh networks, each XBee device can act as a router, extending the network’s range and providing multiple pathways for data transmission. This makes them particularly robust for large-scale deployments.
The modules support both AT (transparent) and API (application programming interface) operating modes. AT mode is simpler, treating the XBee as a serial line replacement, while API mode offers more advanced features like addressing, packet delivery confirmation, and remote device management capabilities.

Setting Up XBee with Raspberry Pi
Hardware Assembly
The physical setup of an XBee module with your Raspberry Pi requires careful attention to the wiring connections to ensure proper communication. Start by connecting the XBee module to a compatible breakout board or adapter, which makes it easier to access the pins. For the basic setup, you’ll need to make four essential connections: power (3.3V), ground (GND), transmit (TX), and receive (RX).
Connect the XBee’s VCC pin to the Raspberry Pi’s 3.3V power pin (Pin 1), and the GND pin to any ground pin on the Pi. For serial communication, connect the XBee’s DOUT (TX) pin to the Pi’s RX pin (GPIO15/Pin 10), and the XBee’s DIN (RX) pin to the Pi’s TX pin (GPIO14/Pin 8). This configuration is similar to connecting sensors to Raspberry Pi, but requires special attention to the voltage levels.
Remember that XBee modules operate at 3.3V, which matches the Raspberry Pi’s logic levels, making them compatible without additional level shifting. However, if you’re using an XBee Pro or other variants, verify the voltage requirements before making connections. Once the hardware assembly is complete, secure all connections and ensure no loose wires could cause short circuits.
Software Configuration
Before you can start communicating with your XBee module through the Raspberry Pi, you’ll need to set up the necessary software components. First, ensure your Raspberry Pi is running the latest version of Raspberry Pi OS and has all system updates installed using the terminal commands ‘sudo apt update’ followed by ‘sudo apt upgrade’.
To interface with the XBee module, you’ll need to install Python’s serial communication library. Open the terminal and run ‘sudo apt-get install python3-serial’ to install this essential package. For more advanced features and easier module configuration, it’s recommended to install XCTU, Digi’s official XBee configuration utility.
The XBee Python library is another crucial component. Install it using pip with the command ‘pip3 install digi-xbee’. This library provides a comprehensive set of tools for XBee communication and configuration through Python scripts.
Once the software is installed, you’ll need to configure your XBee module. Launch XCTU and connect your XBee to the Raspberry Pi via the USB adapter or GPIO pins. The software will automatically detect your module. Through XCTU’s interface, you can:
– Set the baud rate (typically 9600)
– Configure the PAN ID for network identification
– Set the destination address
– Adjust power levels and encryption settings
For basic communication testing, you can use the Python REPL or create a simple Python script. Here’s a basic example to verify your setup:
“`python
from digi.xbee.devices import XBeeDevice
device = XBeeDevice(“/dev/ttyUSB0”, 9600)
device.open()
device.send_data_broadcast(“Hello XBee!”)
device.close()
“`
Remember to grant your user appropriate permissions to access the serial port by adding them to the ‘dialout’ group using ‘sudo usermod -a -G dialout $USER’. A system restart may be required for these changes to take effect.
Enterprise Applications
Industrial Monitoring
The combination of XBee modules and Raspberry Pi creates powerful solutions for industrial automation applications, particularly in sensor networks and data collection scenarios. This setup enables real-time monitoring of crucial industrial parameters such as temperature, humidity, pressure, and equipment status across large facilities.
Companies can deploy multiple XBee-enabled sensor nodes throughout their facilities, with each node connecting to a central Raspberry Pi hub. This creates a robust mesh network capable of covering extensive industrial spaces while maintaining reliable communication. The XBee’s low-power consumption and long-range capabilities make it ideal for creating scalable industrial monitoring systems.
Data collected from these sensor networks can be processed locally on the Raspberry Pi or transmitted to cloud platforms for advanced analytics. This flexibility allows businesses to implement predictive maintenance schedules, optimize energy consumption, and respond quickly to potential equipment issues. The system can be programmed to trigger automated alerts when measurements exceed predetermined thresholds, enabling proactive maintenance and reducing downtime.
Setting up such a network involves configuring XBee modules in API mode, establishing proper addressing schemes, and implementing appropriate security measures to protect sensitive industrial data. The Raspberry Pi serves as both a data aggregator and gateway, managing the flow of information between the sensor network and enterprise systems.

Building Automation
XBee modules paired with Raspberry Pi create powerful building automation solutions that transform ordinary structures into intelligent environments. By strategically placing XBee-enabled sensors throughout a building, you can monitor and control various parameters such as temperature, humidity, lighting, and occupancy in real-time.
The setup typically involves multiple Raspberry Pi units acting as control nodes, each connected to XBee modules that communicate wirelessly with sensors and actuators. This mesh network architecture enables comprehensive coverage across multiple floors and rooms, with each XBee device capable of relaying data to extend the network’s range.
Common applications include automated HVAC control, where temperature and humidity sensors trigger adjustments to maintain optimal comfort levels while maximizing energy efficiency. Smart lighting systems can automatically adjust based on natural light levels and occupancy, while security features can monitor entry points and movement throughout the building.
Using Python scripts on the Raspberry Pi, you can create sophisticated control logic that responds to various triggers. For example, you might program the system to adjust lighting and temperature based on time of day, occupancy patterns, or external weather conditions. The data collected can also be analyzed to optimize building operations and reduce energy consumption.
The XBee’s reliable mesh networking capabilities, combined with the Raspberry Pi’s processing power, make this combination particularly effective for large-scale building automation projects where traditional wired solutions would be impractical or cost-prohibitive.
Security Considerations
Network Security
When implementing XBee modules with Raspberry Pi in enterprise environments, robust security measures are essential to protect your network and data. The primary security features available for XBee-Raspberry Pi configurations include AES-128 encryption and authentication protocols that safeguard your wireless communications.
To enable encryption, configure your XBee modules using XCTU software to implement AES-128 encryption keys. These keys should be identical across all devices in your network and regularly updated following your organization’s security policies. The encryption process adds minimal overhead while ensuring that data packets remain secure during transmission.
Authentication can be implemented through MAC address filtering and network IDs. Each XBee module has a unique MAC address, which can be used to create whitelists of authorized devices. This is particularly important when scaling Raspberry Pi networks with multiple XBee nodes.
Additional security measures include:
– Setting network encryption keys (NK parameter)
– Enabling API mode for packet verification
– Implementing callback verification
– Regular firmware updates
– Network monitoring for unauthorized devices
Remember to document all security configurations and maintain proper key management procedures. For enterprise deployments, consider implementing a rotation schedule for encryption keys and regularly auditing network access logs to ensure system integrity.
Data Protection
When implementing XBee modules with Raspberry Pi, data protection should be a top priority, especially in IoT applications where sensitive information is transmitted. XBee modules offer several built-in security features that you can leverage to protect your data transmission.
Enable AES-128 encryption on your XBee modules to secure all wireless communications. This can be configured using XCTU software, where you’ll need to set identical encryption keys on all devices in your network. Remember to store these keys securely and never share them in your code repositories.
Access control can be implemented by using the XBee’s addressing features. Configure your modules to communicate only with specific addresses, preventing unauthorized devices from joining your network. You can also enable API mode, which provides additional security through packet verification and error checking.
For Raspberry Pi-side protection, implement SSL/TLS encryption for any web interfaces or remote access points. Use strong authentication mechanisms, such as API keys or JWT tokens, when building applications that interact with your XBee network.
Regular firmware updates for both XBee modules and Raspberry Pi are crucial for maintaining security. Monitor for vulnerability announcements and patch your systems promptly. Additionally, consider implementing a firewall on your Raspberry Pi to control incoming and outgoing traffic to your XBee network.
Remember to keep your encryption keys, network credentials, and sensitive configuration data in separate, encrypted configuration files rather than embedding them directly in your application code.
The integration of XBee modules with Raspberry Pi opens up a world of possibilities for wireless communication and IoT projects. Throughout this guide, we’ve explored the essential aspects of connecting these powerful technologies, from basic setup to advanced implementations. The combination provides a robust foundation for both hobbyist projects and enterprise-level solutions, offering reliable wireless connectivity and versatile programming options.
Key takeaways include the importance of proper serial configuration, the necessity of understanding AT commands for device configuration, and the various communication protocols available for different use cases. Whether you’re building a simple sensor network or developing a complex industrial monitoring system, the XBee-Raspberry Pi combination offers the flexibility and reliability needed for success.
Looking ahead, this technology pairing continues to evolve with new applications emerging regularly. Future considerations might include exploring mesh networking capabilities, implementing enhanced security protocols, and integrating with cloud services for more comprehensive IoT solutions. As both XBee modules and Raspberry Pi hardware continue to advance, we can expect to see even more powerful and efficient communication solutions.
Remember to regularly update your firmware and software components to maintain security and performance. Start with simple projects to build your understanding, and gradually work your way up to more complex implementations. The XBee-Raspberry Pi combination remains a valuable tool in the IoT ecosystem, ready to serve both educational and professional applications.