

Embark on a journey to harness the power of the Internet of Things (IoT) with Raspberry Pi, the credit card-sized computer that has revolutionized hobbyist electronics and STEM education. This versatile device, when combined with sensors, actuators, and network connectivity, opens up a world of possibilities for creating smart, interconnected systems that can sense, analyze, and respond to their environment. From monitoring your home’s energy usage with a solar-powered Raspberry Pi to automating your garden irrigation, the potential applications of IoT with Raspberry Pi are limited only by your imagination. In this comprehensive guide, we’ll explore the fundamentals of IoT integration using Raspberry Pi, equipping you with the knowledge and skills to build your own innovative projects that seamlessly blend the digital and physical worlds. Get ready to unleash your creativity and join the IoT revolution with Raspberry Pi!
Understanding IoT Protocols and Standards
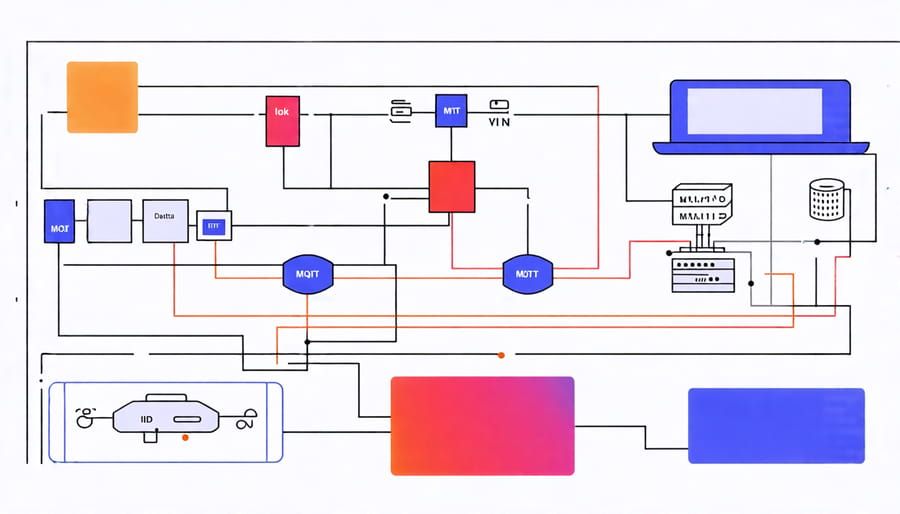
MQTT
MQTT (Message Queuing Telemetry Transport) is a lightweight messaging protocol that enables efficient communication between IoT devices. It follows a publish-subscribe model, where devices can publish messages to topics and subscribe to topics of interest. This allows for seamless data exchange between sensors, actuators, and other IoT components.
MQTT is designed to be resource-efficient, making it ideal for low-power devices and limited network bandwidth scenarios. It uses a client-server architecture, with the MQTT broker acting as the central hub for message distribution. Devices connect to the broker and can publish messages or subscribe to specific topics.
The publish-subscribe model of MQTT enables decoupling between the sender and receiver, as they don’t need to know about each other’s existence. This flexibility allows for scalable and dynamic IoT systems where devices can join or leave the network without disrupting the overall communication flow.
MQTT supports various quality of service (QoS) levels, ensuring reliable message delivery even in unreliable network conditions. It also provides security features like client authentication and encrypted communication using TLS/SSL.
By leveraging MQTT, IoT developers can build efficient and scalable systems that enable real-time data exchange, remote monitoring, and control of connected devices. MQTT’s simplicity and lightweight nature make it a popular choice for IoT projects, especially when using resource-constrained devices like Raspberry Pi.
CoAP
The Constrained Application Protocol (CoAP) is a lightweight protocol designed specifically for IoT devices with limited resources. It enables efficient communication between these devices and larger systems, making it an ideal choice for IoT integration with Raspberry Pi. CoAP operates on top of UDP, providing a reliable yet streamlined approach to data transfer.
One of the key benefits of CoAP is its low overhead, which conserves both processing power and battery life on resource-constrained devices. This makes it possible to connect a wide range of sensors and actuators to your Raspberry Pi without overburdening the system. CoAP also supports built-in discovery mechanisms, allowing devices to easily find and communicate with each other within an IoT network.
Moreover, CoAP offers enhanced security features, such as DTLS (Datagram Transport Layer Security), ensuring that data transmitted between devices remains confidential and protected from unauthorized access. This is crucial for maintaining the integrity and privacy of your IoT system.
Other Notable Protocols
In addition to MQTT, several other protocols play important roles in IoT integration. HTTP (Hypertext Transfer Protocol) is a widely used protocol for web-based communication. It enables IoT devices to communicate with web servers and APIs, making it easy to integrate with existing web infrastructure. WebSocket is another protocol that allows real-time, bidirectional communication between devices and servers over a single connection. This makes it ideal for scenarios requiring instant updates and live data streaming.
AMQP (Advanced Message Queuing Protocol) is a messaging protocol designed for reliability and scalability. It supports features like message queuing, routing, and reliable delivery, making it suitable for large-scale IoT deployments where data needs to be processed and distributed efficiently. Other protocols like CoAP (Constrained Application Protocol) and DDS (Data Distribution Service) are lightweight alternatives optimized for resource-constrained devices and real-time data distribution, respectively.
When choosing a protocol for your IoT project, consider factors such as device capabilities, network conditions, scalability requirements, and compatibility with existing systems. By leveraging the right combination of protocols, you can build robust and efficient IoT solutions that seamlessly integrate with the Raspberry Pi ecosystem.
Setting Up Your Raspberry Pi for IoT
Choosing the Right Raspberry Pi Model
When choosing a Raspberry Pi model for IoT projects, consider your specific requirements. The Raspberry Pi 4 Model B is an excellent choice for most IoT applications due to its powerful quad-core processor, up to 8GB RAM, and built-in wireless connectivity. It offers ample performance for running multiple sensors and actuators while handling data processing and communication tasks.
For simpler projects with fewer components, the Raspberry Pi Zero W is a compact and affordable option that still provides Wi-Fi and Bluetooth capabilities. If your IoT project requires more advanced features like AI inference or video processing, the Raspberry Pi Compute Module 4 offers flexibility and customization options.
Ultimately, the best Raspberry Pi model for your IoT project depends on factors such as processing power, memory, connectivity, and project complexity. Assess your needs and budget to make an informed decision that aligns with your IoT goals.
Installing and Configuring the OS
To get started with your Raspberry Pi IoT project, you’ll need to install and configure the operating system. The most popular choice is Raspberry Pi OS, a Debian-based Linux distribution optimized for the Pi.
First, download the latest version of Raspberry Pi OS from the official website. You can choose between the desktop or lite version, depending on your needs. Next, write the image file to a microSD card using a tool like Etcher or Raspberry Pi Imager.
Once the microSD card is ready, insert it into your Raspberry Pi and connect the power supply. The Pi will boot up, and you’ll be greeted with the setup wizard. Follow the prompts to configure your language, time zone, and Wi-Fi settings.
After the initial setup, it’s a good idea to update your system to ensure you have the latest security patches and software versions. Open a terminal and run:
sudo apt update
sudo apt upgrade
Now, you can start customizing your Raspberry Pi for your IoT project. Consider enabling SSH and VNC for remote access, and install any necessary libraries or tools for your specific application.
With your Raspberry Pi OS installed and configured, you’re ready to dive into the exciting world of IoT development!
Connecting Sensors and Devices
GPIO Basics
The Raspberry Pi’s GPIO (General Purpose Input/Output) pins are a powerful feature that allows you to connect various sensors, actuators, and other electronic components directly to your Pi. These pins can be programmed to read inputs or send outputs, enabling you to create interactive projects and control external devices. To get started with GPIO, you’ll need to familiarize yourself with the pin layout and numbering scheme. The Pi has 40 GPIO pins, each with a specific function. Some pins provide power (3.3V or 5V), while others are used for ground, I2C, SPI, or UART communication. With a basic understanding of the GPIO pinout, you can begin writing code to interact with connected components. Popular programming languages like Python and C++ offer libraries and functions specifically designed for GPIO control, making it easy to read sensor data or send signals to actuators.
I2C and SPI Communication
I2C (Inter-Integrated Circuit) and SPI (Serial Peripheral Interface) are two common communication protocols used to connect devices to your Raspberry Pi. I2C uses just two wires, SDA (data) and SCL (clock), to transmit data between devices. It’s ideal for connecting multiple devices that don’t require high-speed communication, such as sensors and real-time clocks.
To connect an I2C device, locate the SDA and SCL pins on your Raspberry Pi’s GPIO header. Most newer models have dedicated I2C pins, while older ones may require you to enable I2C through the raspi-config utility. Once enabled, connect the device’s SDA and SCL pins to the corresponding pins on the Pi. You’ll also need to connect the device’s power and ground pins to the appropriate pins on the GPIO header.
SPI, on the other hand, uses four wires: MOSI (Master Out Slave In), MISO (Master In Slave Out), SCLK (Serial Clock), and CS (Chip Select). This protocol is faster than I2C and is often used for devices that require high-speed data transfer, such as SD card modules and displays.
To connect an SPI device, locate the MOSI, MISO, SCLK, and CS pins on your Pi’s GPIO header. Like I2C, you may need to enable SPI through raspi-config. Connect the device’s corresponding pins to the Pi, along with power and ground. If you’re connecting multiple SPI devices, each one will need its own unique CS pin.
Once your devices are connected, you can communicate with them using Python libraries like SMBus for I2C and spidev for SPI. These libraries provide simple interfaces for reading from and writing to your connected devices, making it easy to integrate them into your IoT projects.
Example IoT Integration Project
Here’s a step-by-step tutorial on building a simple IoT application with Raspberry Pi:
1. Gather the necessary components:
– Raspberry Pi board (e.g., Raspberry Pi 4)
– DHT11 or DHT22 temperature and humidity sensor
– Breadboard and jumper wires
– Power supply for Raspberry Pi
2. Set up your Raspberry Pi:
– Install the latest version of Raspberry Pi OS on an SD card
– Connect your Raspberry Pi to a monitor, keyboard, and mouse
– Configure basic settings like timezone, Wi-Fi, and SSH access
3. Connect the DHT11/DHT22 sensor to your Raspberry Pi:
– Place the sensor on the breadboard
– Connect VCC pin to 3.3V or 5V pin on Raspberry Pi
– Connect GND pin to a GND pin on Raspberry Pi
– Connect the DATA pin to a GPIO pin (e.g., GPIO4)
4. Install necessary libraries:
– Open a terminal on your Raspberry Pi
– Install the Adafruit DHT library by running:
“`
sudo pip3 install Adafruit_DHT
“`
5. Write the Python script:
– Create a new Python file (e.g., `dht_sensor.py`)
– Import the required libraries:
“`python
import Adafruit_DHT
import time
“`
– Set up the sensor type and GPIO pin:
“`python
sensor = Adafruit_DHT.DHT11
pin = 4
“`
– Create an infinite loop to read sensor data:
“`python
while True:
humidity, temperature = Adafruit_DHT.read_retry(sensor, pin)
if humidity is not None and temperature is not None:
print(f”Temperature: {temperature:.1f}°C, Humidity: {humidity:.1f}%”)
else:
print(“Failed to retrieve data from sensor”)
time.sleep(2)
“`
6. Run the script:
– Save the Python file
– Run the script using the command:
“`
python3 dht_sensor.py
“`
– You should see temperature and humidity readings printed every 2 seconds
7. Extend the project:
– Display the sensor data on an LCD or OLED screen
– Send the sensor data to a cloud platform like ThingSpeak or AWS IoT
– Create a web interface to monitor and visualize the sensor data
– Integrate with other sensors or actuators to build a more complex IoT application
This basic tutorial demonstrates how to read data from a DHT11/DHT22 sensor using a Raspberry Pi. It serves as a foundation for exploring more advanced IoT projects and integrations. Have fun experimenting and building your own IoT applications with Raspberry Pi!
Conclusion
In conclusion, integrating IoT with Raspberry Pi opens up a world of possibilities for innovative projects and applications. By leveraging the power of sensors, actuators, and wireless connectivity, you can create smart devices that collect data, automate tasks, and enable remote monitoring and control. Remember to follow IoT security best practices to ensure the safety and privacy of your projects. With the knowledge and hands-on experience gained from this article, you’re now equipped to embark on your own IoT adventures using Raspberry Pi. Start experimenting, exploring new ideas, and pushing the boundaries of what’s possible with this incredible single-board computer. The future of IoT is in your hands!